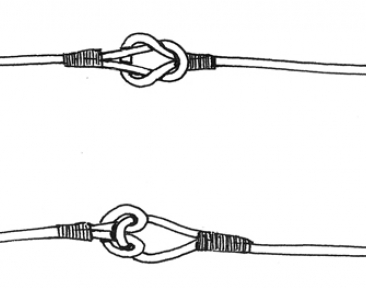
A loop-to-loop connection should be seated like a reef or square knot (top) to provide maximum strength and a streamlined, compact shape. An improperly seated loop-to-loop connection (bottom) may deform the line and catch on the rod guides.
Your rod, reel, and line are important, but putting it all together and making it work effectively is a major obstacle to many new fly fishers.
If you want to get started quickly, consider purchasing one of the many complete starter kits available at local fly shops such as a Cortland 444+ Outfit, Scientific Anglers Trout Fly Fishing Kit, Orvis Fly Fishing Outfit, or similar. This is an easy way to get started, but a packaged outfit won’t help you learn to do it yourself the next time around or to replace one of the components in your system.
The best way to get started is to do it yourself using the instructions here. In addition to your rod, reel, and fly line, you will need fly line backing, a knotless tapered leader, spools of tippet material and, of course, your flies.
Backing. Most fly lines are 90 to 110 feet long. What happens if you hook a very large fish that runs, unstopped, 150 feet downstream? If your system is set up correctly, the rear of the fly line exits the rod tip but is attached to the fly line backing, which is a thin thread of Dacron or gel-spun polyethylene.
Backing keeps you connected to long-running fish, but more importantly, it fills the bottom of the reel arbor. Your reel is designed to hold a fly line plus a certain amount of backing. (Usually 100 to 150 yards of 20- or 30-pound-test Dacron for most trout reels, and more than 250 yards of backing on large saltwater reels used for tarpon, billfish, or other large fish.)
Even if you don’t plan on catching anything larger than panfish, you must fill the reel arbor with the appropriate amount of backing. Otherwise your fly line will be coiled too tightly around the narrow spindle, and will be difficult to straighten and use effectively.
Many reels have a mark on the inside of the spool frame to indicate how far to fill your reel with backing. If not, fill it to about one-third to one-half full.
It’s a good idea to buy your backing and fly line at a specialty fly shop, not only because the employees there can advise you on the best line for your local conditions, but because they have a line winder that spools exactly the right amount of line onto your reel effectively and quickly.
Winding backing onto a reel is time-consuming (150 yards at one inch per crank), and the backing must be wound tightly and evenly, i.e. back and forth across the width of the reel arbor. If you wind loose coils of backing near the base of the arbor, then wind tighter layers on top (such as when you land a large fish, or merely when you complete the job of winding the backing onto the reel) then the tight coils bury themselves under the loose coils, creating a snarl that jams your reel. Wind your backing onto the reel properly to avoid problems later.
If you can’t have a fly shop put backing on your reel, you can do it yourself with a little time and patience. First, it’s easiest to wind the backing if the reel is attached to the rod butt, so attach your empty reel to the rod in the position you intend to crank. If you cast with your right hand, you should crank counterclockwise with your left hand, so lock your reel onto the reel seat with the reel handle facing to the left.
[Some saltwater experts recommend switching hands after a fish is hooked, and cranking the reel with the dominant hand. This may be important for large saltwater fish because your “weak” hand can tire from reeling quicker than your strong hand. However, for most trout, this is not an issue. Whatever you choose—left- or right-hand retrieve—do what feels most comfortable. There is no wrong way here. The Editor.]
Take the end of the fly line backing from the product spool, thread it through the rod’s stripping guide, through the reel line guard, around the spool arbor, and back out through the line guard. Use the tag end to tie a Duncan loop knot around the standing portion of the backing and then slide the knot tightly against the reel arbor.
To ensure that you wind the backing under tension, have someone run a pencil through the backing product spool and hold the ends of the pencil so the spool turns freely. Between the product spool and the reel, the backing should pass between the pages of a phone book or other object to create tension.
We recommend running the backing through a folded towel. Then you can step on the towel to create the tension you need to wind the backing tightly. As you crank the reel to wind the backing, move the backing back and forth across the width of the spool so it winds evenly and does not pile up on one side of the spool or the other.
Attaching the fly line. Most fly lines today come with a welded loop at the front and back. To attach the fly line to your backing, tie a double or triple overhand loop knot in the end of the backing. Make sure the loop is large enough to pass the fly-line product spool through it.
To connect the two loops, pass the large backing loop through the small loop in the fly line end and then pass the whole fly line spool through the backing loop to create a loop-to-loop connection. Make sure your loop-to-loop connection is seated correctly. The loops should lock together like a reef knot (square knot); otherwise the connection is bulky and won’t easily pass through the rod guides.
If you have an older or value-priced fly line, you may not have a welded loop at the end and you’ll need to tie a tube nail knot (see illustration, page 25) to connect the fly line to the backing. The nail knot is strong enough to hold most freshwater fish, but you may want to coat the knot with Dave’s Flexament or Softex to keep the junction smooth.
Continued – click on page link below.